Klargøring til DPG Outlook Office Addin
Dette dokument beskriver den konfiguration, der er nødvendig for at aktivere Single sign-on (App registration) for DPG Outlook Office Addin.
Ny eller eksisterende kunde?
Hvis du er en ny kunde, klargøres denne app-registrering som en del af den indledende konfiguration og levering.
Hvis du er en eksisterende kunde, og du ikke tidligere har klargjort brugen af den nye DPG Outlook Office Addin, skal du konfigurere app-registreringen som beskrevet nedenfor. Når dette er gennemført, og oplysninger om app-registreringen er overdraget til DPG Service Center, bør du ikke foretage ændringer i app-registreringen, medmindre du bliver instrueret af Timengo DPG Support.
DPG Outlook Office Addin autentificerer mod Azure som en Registered Application og bruger OAuth 2.0. For mere information om dette, se denne Microsoft-side.
Der er to måder at registrere appen i Azure på: Du kan køre PowerShell-scriptet nedenfor, eller du kan konfigurere Azure manuelt ved at følge trin-for-trin-vejledningen.
Her er PowerShell-scriptet, som kan konfigurere Azure for dig:
Create-DPGAppRegistration script (zip-fil)
Eller du kan se det og kopiere det herfra:
Create-DPGAppRegistration
# DPG Office Addin PowerShell Script Template
# Script to create Azure App Registration for DPG Office Add-in
# Requires Azure AD PowerShell module (Az.Resources) and Microsoft.Graph module

# Parameters
param(
    [Parameter(Mandatory=$false)]
    [string]$AppName = "DPG Office Add-in (dpgofficeaddin.dpgapi.dk)",

    [Parameter(Mandatory=$false)]
    [string[]]$RedirectUris = @(
        "https://dpgofficeaddin.dpgapi.dk",
        "brk-multihub://dpgofficeaddin.dpgapi.dk"
    ),

    [Parameter(Mandatory=$false)]
    [string]$MicrosoftOfficeClientId = "ea5a67f6-b6f3-4338-b240-c655ddc3cc8e",

    [Parameter(Mandatory=$false)]
    [string]$TenantId
)

# Check if required modules are installed
if (-not (Get-Module -ListAvailable -Name Microsoft.Graph.Authentication)) {
    Write-Host "Microsoft Graph PowerShell module not found. Installing..."
    Install-Module Microsoft.Graph -Scope CurrentUser -Force
}

if (-not (Get-Module -ListAvailable -Name Az.Accounts)) {
    Write-Host "Az.Accounts module not found. Installing..."
    Install-Module -Name Az.Accounts -Scope CurrentUser -Force
}

# Import required modules
Import-Module Az.Accounts
Import-Module Microsoft.Graph.Applications
Import-Module Microsoft.Graph.Authentication

# Disconnect from Microsoft Graph
Write-Host "Disconnecting from Microsoft Graph... So we can connect with required permissions"
Disconnect-MgGraph -ErrorAction SilentlyContinue | Out-Null

# Resolve tenant to use (optional interactive picker when multiple)
try {
    if ([string]::IsNullOrWhiteSpace($TenantId)) {
        Write-Host "Detecting available tenants..."
        Disconnect-AzAccount -ErrorAction SilentlyContinue | Out-Null
        Connect-AzAccount | Out-Null

        $tenants = Get-AzTenant | Select-Object Id, Name, DefaultDomain
        if (-not $tenants -or $tenants.Count -eq 0) {
            throw "No tenants available for the signed-in account."
        }

        if ($tenants.Count -gt 1) {
            Write-Host "Multiple tenants found:`n"
            for ($i = 0; $i -lt $tenants.Count; $i++) {
                $t = $tenants[$i]
                Write-Host ("[{0}] {1} ({2}) - {3}" -f ($i+1), $t.Name, $t.DefaultDomain, $t.Id)
            }

            do {
                $choice = Read-Host "Enter the number of the tenant to use"
                $parsed = 0
                $validInt = [int]::TryParse($choice, [ref]$parsed)
                $valid = $validInt -and ($parsed -ge 1) -and ($parsed -le $tenants.Count)
                if (-not $valid) { Write-Host "Invalid choice. Try again." -ForegroundColor Yellow }
            } while (-not $valid)

            $TenantId = $tenants[$parsed - 1].Id
        }
        else {
            $TenantId = $tenants[0].Id
        }
    }
}
catch {
    Write-Error "Failed to detect/select tenant: $_"
    exit 1
}

# Connect to Microsoft Graph with required permissions
try {
    Write-Host "Connecting to Microsoft Graph..."
    $scopes = @(
        "Application.ReadWrite.All",
        "Directory.ReadWrite.All",
        "DelegatedPermissionGrant.ReadWrite.All"
    )

    Connect-MgGraph -TenantId $TenantId -Scopes $scopes | Out-Null
}
catch {
    Write-Error "Failed to connect to Microsoft Graph: $_"
    exit 1
}

# Resolve tenant to use
try {
    $ctx = Get-MgContext
    $tenantId = $ctx.TenantId
    if ([string]::IsNullOrWhiteSpace($tenantId)) {
        throw "Could not resolve tenant ID from Microsoft Graph context."
    }
    Write-Host "Directory (tenant) ID selected: $tenantId"
}
catch {
    Write-Error "Failed to resolve tenant ID: $_"
    exit 1
}

# Create the application registration
try {
    # Create the application
    Write-Host "Creating application registration..."

    # Create with SPA redirect URIs (your previous script used SPARedirectUri)
    $app = New-MgApplication `
        -DisplayName $AppName `
        -SignInAudience "AzureADMyOrg" `
        -Spa @{ RedirectUris = $RedirectUris }

    if (-not $app) {
        throw "Failed to create application"
    }

    Write-Host "Application created successfully!"
    Write-Host "Application (client) ID: $($app.AppId)"
    Write-Host "Directory (tenant) ID: $tenantId"

    # Set the Application ID URI
    Write-Host "Setting Application ID URI..."
    $appIdUri = "api://dpgofficeaddin.dpgapi.dk/$($app.AppId)"
    Update-MgApplication -ApplicationId $app.Id -BodyParameter @{
        identifierUris = @($appIdUri)
    } | Out-Null

    # Create scope ID that we'll use for both the scope and pre-authorized application
    $scopeId = [guid]::NewGuid()

    # Build requiredResourceAccess for Microsoft Graph delegated permissions
    Write-Host "Adding API permissions..."
    $graphResourceAppId = "00000003-0000-0000-c000-000000000000" # Microsoft Graph

    $requiredResourceAccess = @(
        @{
            resourceAppId  = $graphResourceAppId
            resourceAccess = @(
                @{ id = "64a6cdd6-aab1-4aaf-94b8-3cc8405e90d0"; type = "Scope" }, # email
                @{ id = "37f7f235-527c-4136-accd-4a02d197296e"; type = "Scope" }, # openid
                @{ id = "14dad69e-099b-42c9-810b-d002981feec1"; type = "Scope" }, # profile
                @{ id = "570282fd-fa5c-430d-a7fd-fc8dc98a9dca"; type = "Scope" }, # Mail.Read
                @{ id = "e1fe6dd8-ba31-4d61-89e7-88639da4683d"; type = "Scope" }, # User.Read
                @{ id = "e383f46e-2787-4529-855e-0e479a3ffac0"; type = "Scope" }, # Mail.Send
                @{ id = "7b9103a5-4610-446b-9670-80643382c1fa"; type = "Scope" }, # Mail.Read.Shared
                @{ id = "a367ab51-6b49-43bf-a716-a1fb06d2a174"; type = "Scope" }  # Mail.Send.Shared
            )
        }
    )

    Write-Host "Adding 'Authenticated' scope..."
    $oauth2PermissionScopes = @(
        @{
            id = $scopeId
            adminConsentDescription = "Authenticated"
            adminConsentDisplayName = "Authenticated"
            userConsentDescription = "Authenticated"
            userConsentDisplayName = "Authenticated"
            isEnabled = $true
            type = "User"
            value = "Authenticated"
        }
    )

    Update-MgApplication -ApplicationId $app.Id -BodyParameter @{
        api = @{
            oauth2PermissionScopes = $oauth2PermissionScopes
            requestedAccessTokenVersion = 2
        }
        requiredResourceAccess = $requiredResourceAccess
    } | Out-Null

    Write-Host "Pre-authorizing Microsoft Office client..."
    Start-Sleep -Seconds 5

    Update-MgApplication -ApplicationId $app.Id -BodyParameter @{
        api = @{
            preAuthorizedApplications = @(
                @{
                    appId = $MicrosoftOfficeClientId
                    delegatedPermissionIds = @($scopeId)
                }
            )
        }
    } | Out-Null

    # Create a service principal for the application
    Write-Host "Creating service principal..."
    $servicePrincipal = New-MgServicePrincipal -AppId $app.AppId
    Start-Sleep -Seconds 5  # Wait for service principal to be fully created

    # Get Microsoft Graph service principal
    Write-Host "Getting Microsoft Graph permissions..."
    $graphServicePrincipal = Get-MgServicePrincipal -Filter "appId eq '$graphResourceAppId'"

    # Grant admin consent for all required permissions
    Write-Host "Granting admin consent for permissions..."
    try {
        Write-Host "Service Principal ID: $($servicePrincipal.Id)"
        Write-Host "Graph Service Principal ID: $($graphServicePrincipal.Id)"

        New-MgOauth2PermissionGrant `
            -ClientId $servicePrincipal.Id `
            -ConsentType "AllPrincipals" `
            -ResourceId $graphServicePrincipal.Id `
            -Scope "email openid profile Mail.Read User.Read Mail.Send Mail.Read.Shared Mail.Send.Shared" | Out-Null

        Write-Host "Successfully granted admin consent for permissions" -ForegroundColor Green
    }
    catch {
        Write-Host "Failed to grant admin consent for permissions: $_" -ForegroundColor Red
    }

    Write-Host "App registration setup completed successfully!"
    Write-Host ""
    Write-Host "Application details for handover to Timengo DPG:"
    Write-Host "Application (client) ID: $($app.AppId)"
    Write-Host "Directory (tenant) ID: $tenantId"

    $cwd = Split-Path -Path $PSCommandPath -Parent
    Set-Content -Path $cwd\DPGOfficeAddin-TechnicalDetails.txt -Value "Application (client) ID: $($app.AppId)`nDirectory (tenant) ID: $tenantId"
    write-host "Details saved to $cwd\DPGOfficeAddin-TechnicalDetails.txt"

    # Disconnect from Microsoft Graph
    Write-Host "Disconnecting from Microsoft Graph..."
    Disconnect-MgGraph -ErrorAction SilentlyContinue | Out-Null
}
catch {
    Write-Error "Failed to create app registration: $_"
    exit 1
}
Trin-for-trin-vejledning
Ved at følge trinene for manuel Azure-konfiguration får du bedre forståelse for opsætningen. Scriptet ovenfor er en automatiseret version af trinene nedenfor. Bemærk, at det er vigtigt at gennemføre hvert trin i den angivne rækkefølge!
Gennemfør følgende trin for at konfigurere App registration i Azure:
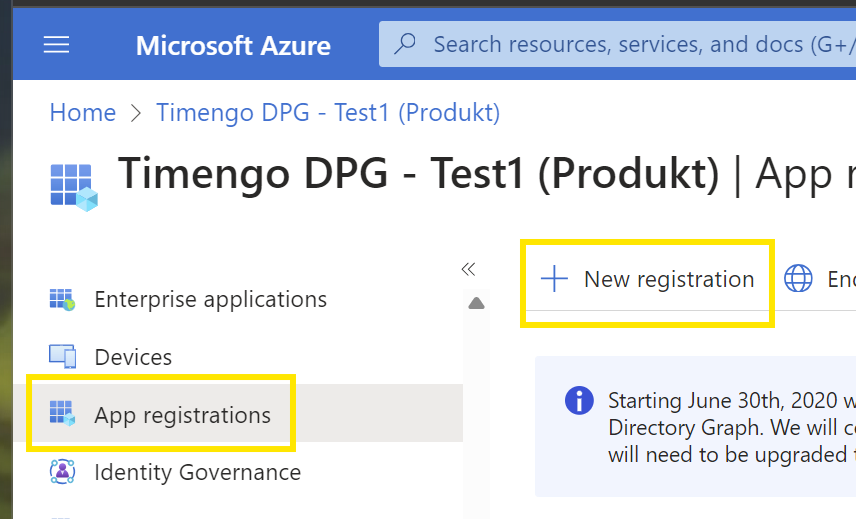
- Log ind på Azure som administrator, og gå til Microsoft Entra ID.
-
Vælg App registrations, og vælg New registration:
-
Angiv detaljer for app-registreringen
- Sæt Name til
DPG Office Add-in (dpgofficeaddin.dpgapi.dk) - Vælg Supported account types som
Accounts in this organization directory only (Single tenant) - Sæt Redirect URI til
Single-page application (SPA), og sæt værdien tilhttps://dpgofficeaddin.dpgapi.dk - Afslut ved at vælge Register.
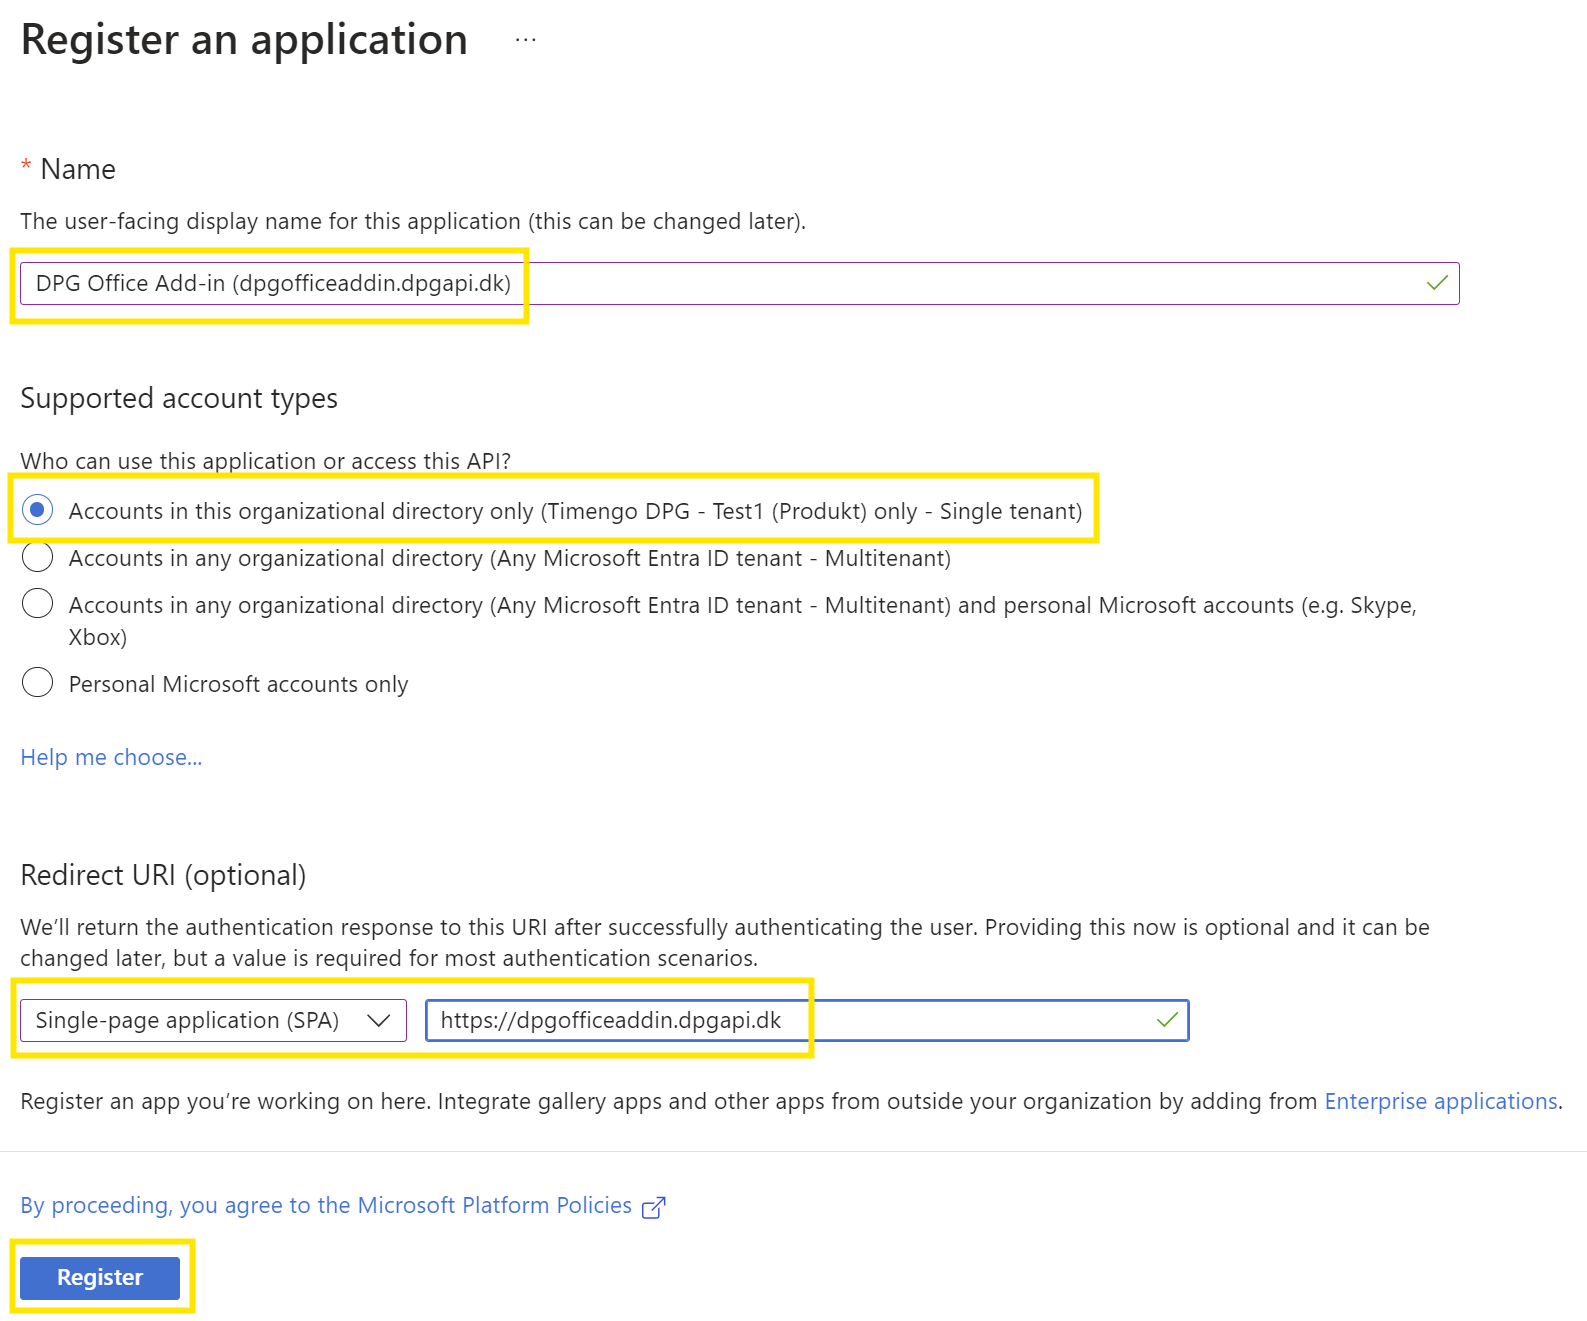
- Sæt Name til
-
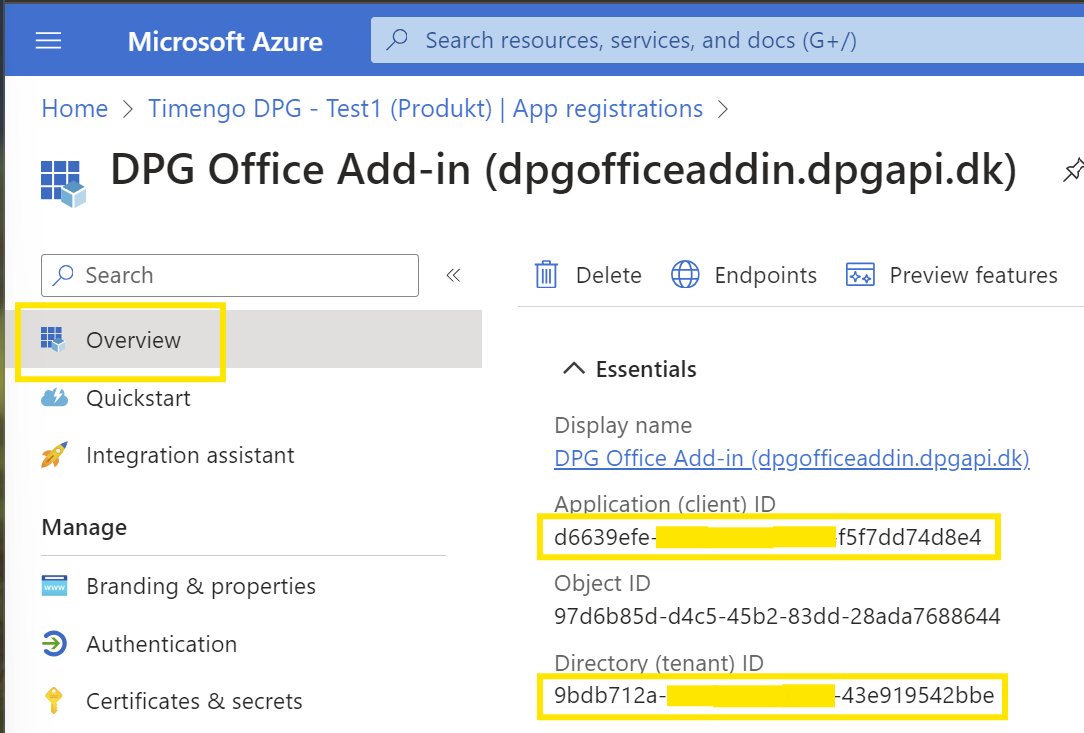
Notér Application (client) ID og Directory (tenant) ID fra sektionen Overview som markeret nedenfor.
-
Vælg Expose an API, og vælg Add for at oprette en Application ID URI.
-
Opdatér Application ID URI til
api://dpgofficeaddin.dpgapi.dk/<Application (client) ID>, og afslut ved at vælge Save:
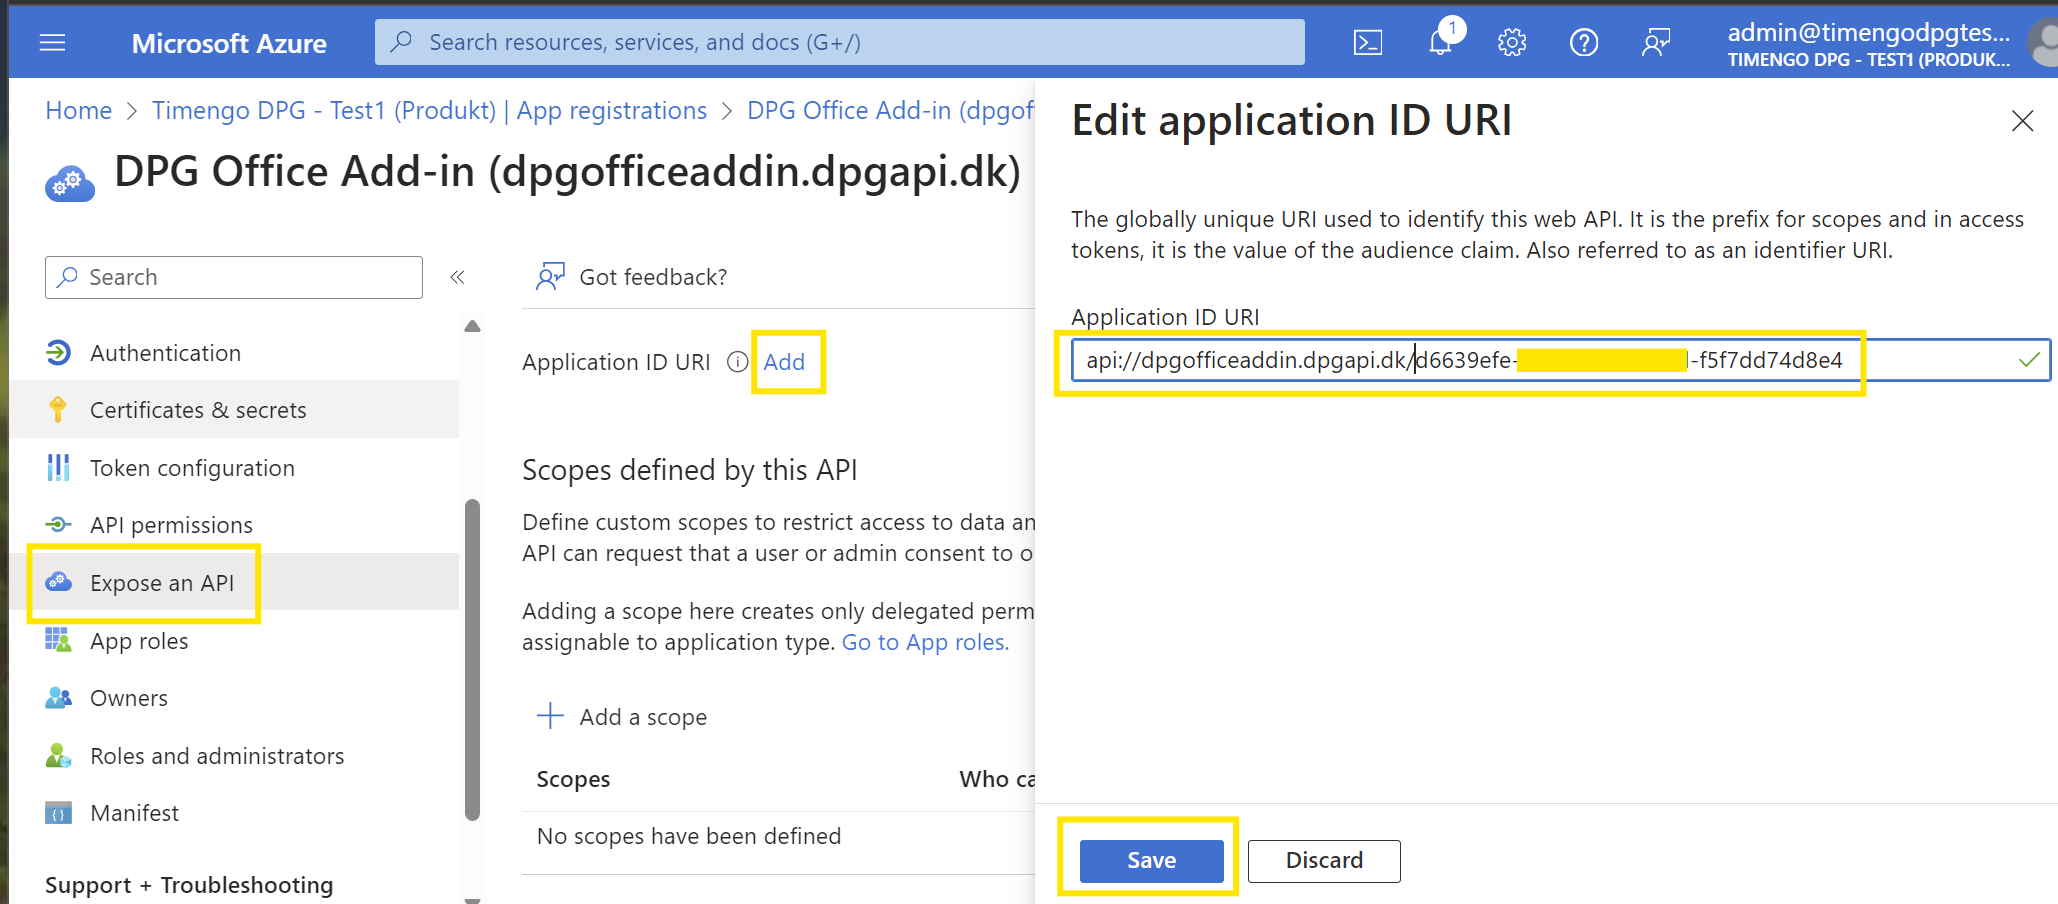
-
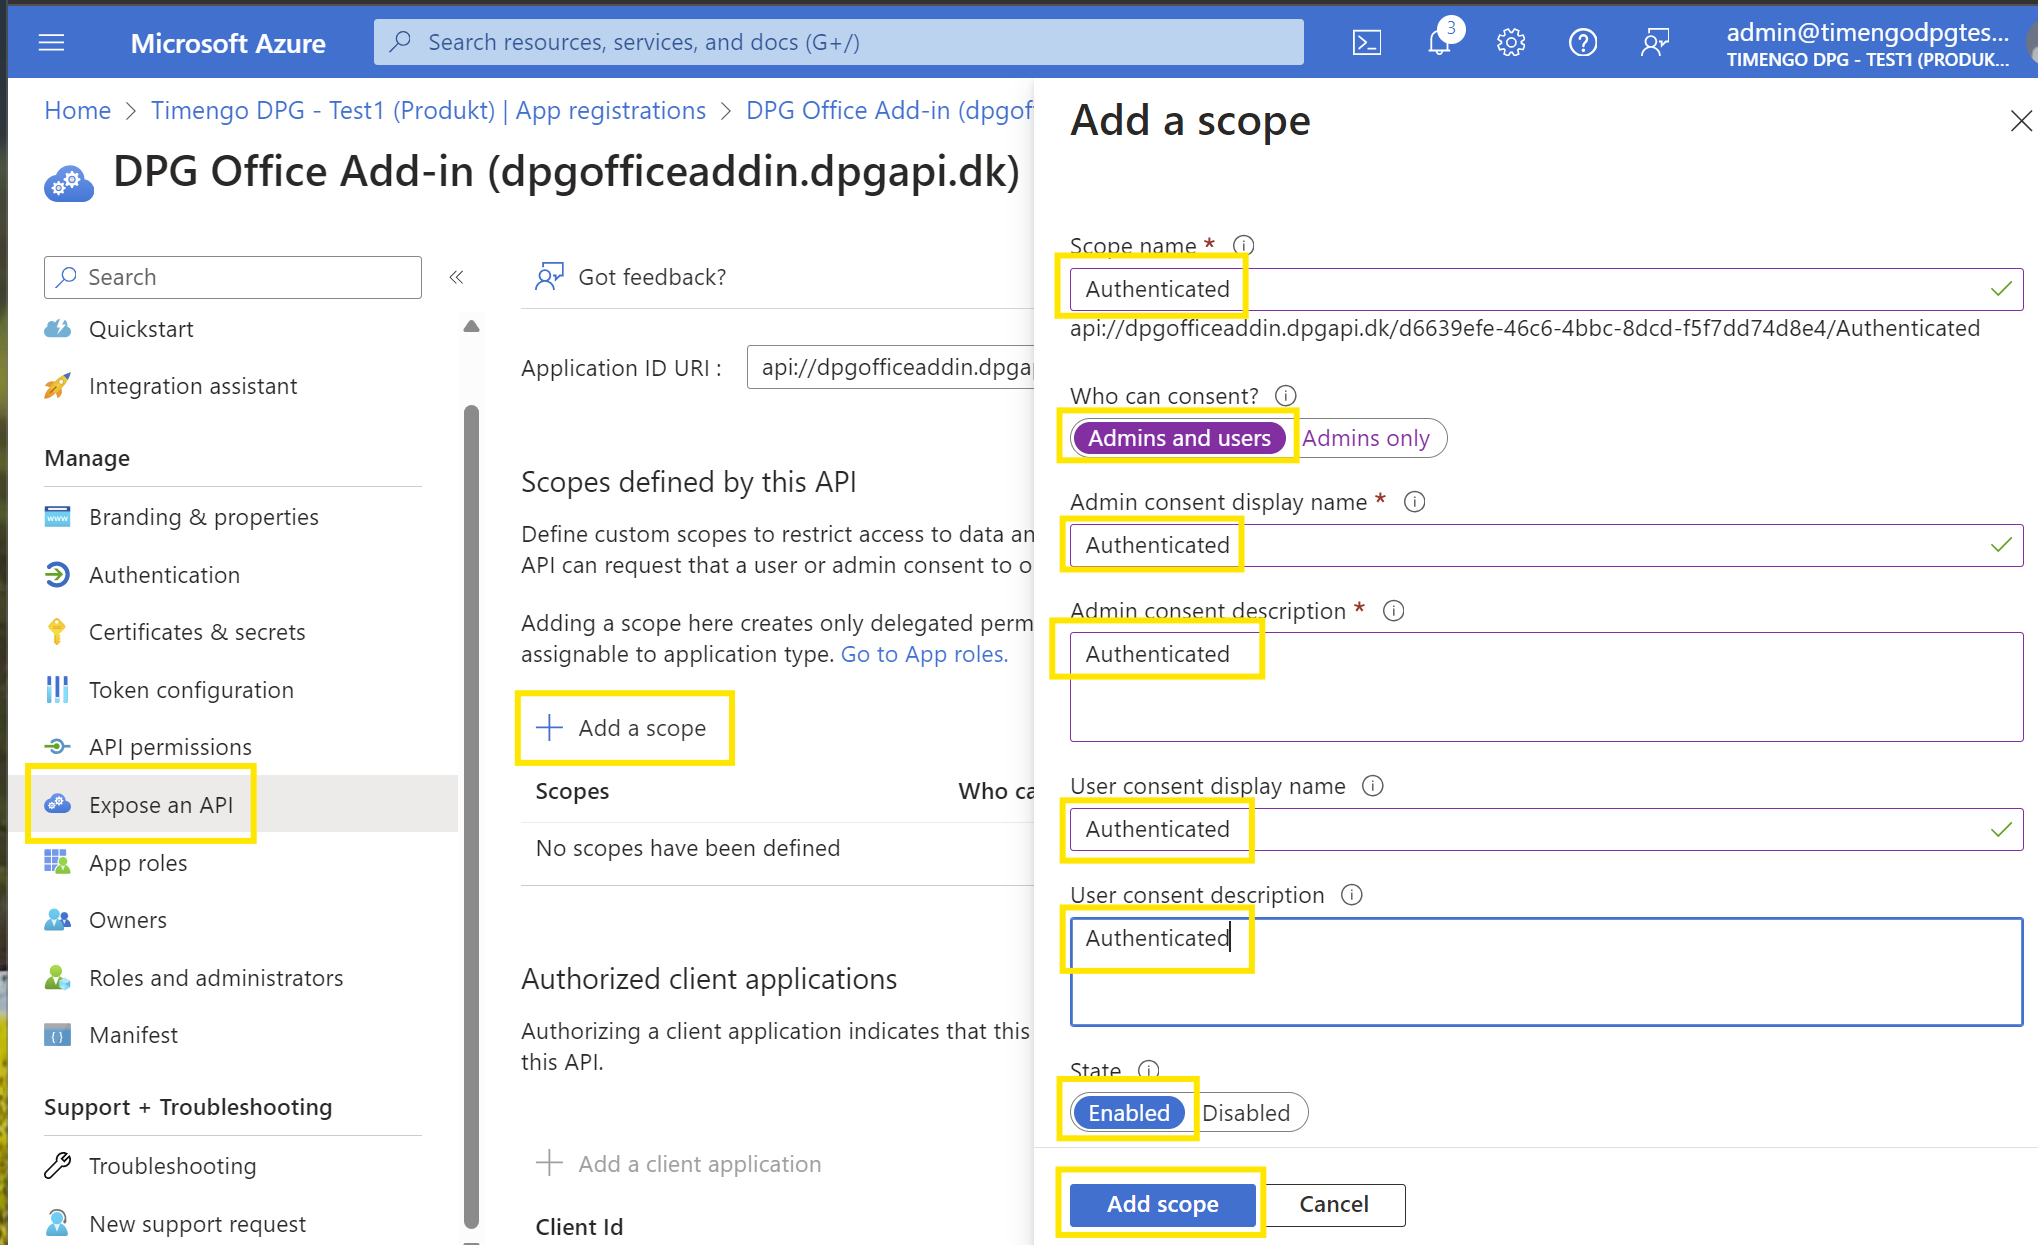
Vælg nu Add a scope i panelet Expose an API, og indsæt teksten
Authenticatedsom vist nedenfor. Sørg for at vælge Admin and users i feltet Who can consent?, og Enabled i feltet State. Afslut ved at vælge Add scope:
-
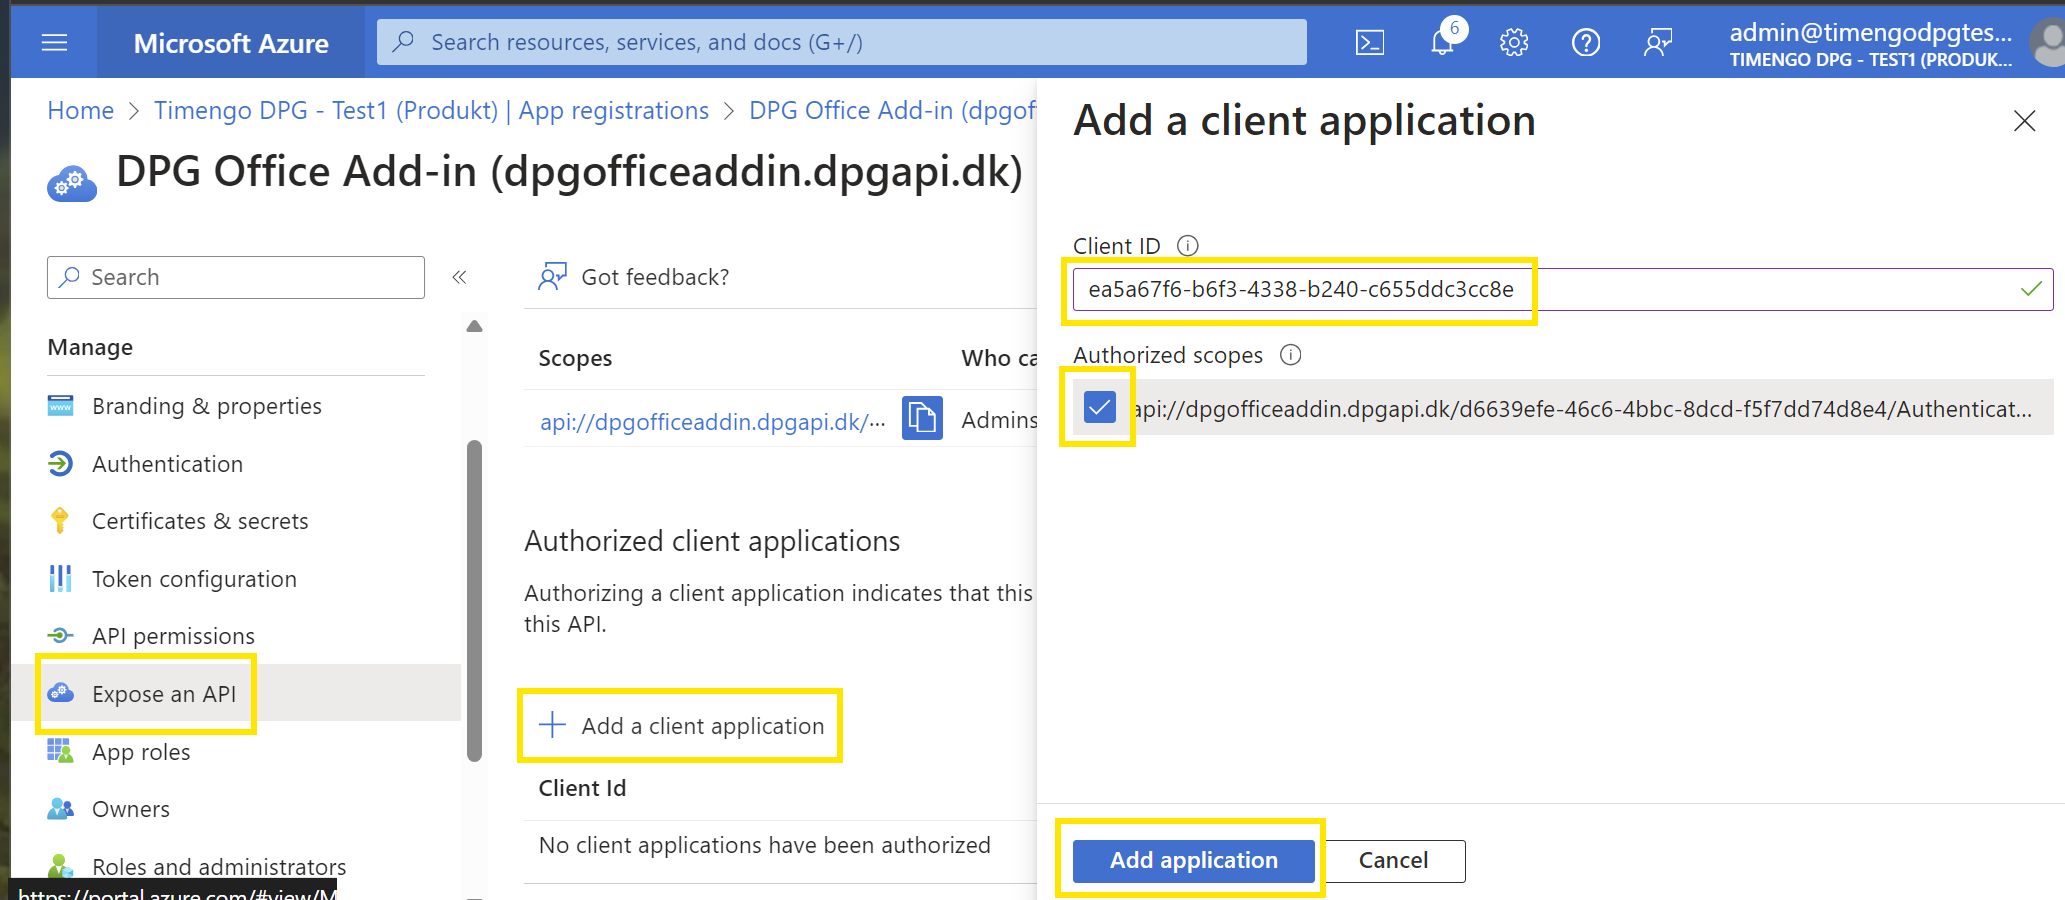
Stadig i panelet Expose an API, vælg Add a client application, og indsæt
ea5a67f6-b6f3-4338-b240-c655ddc3cc8e, som forhåndsgodkender alle Microsoft Office Application-endpoints. Vælg også feltet Authorized scopes, og afslut ved at vælge Add application:
-
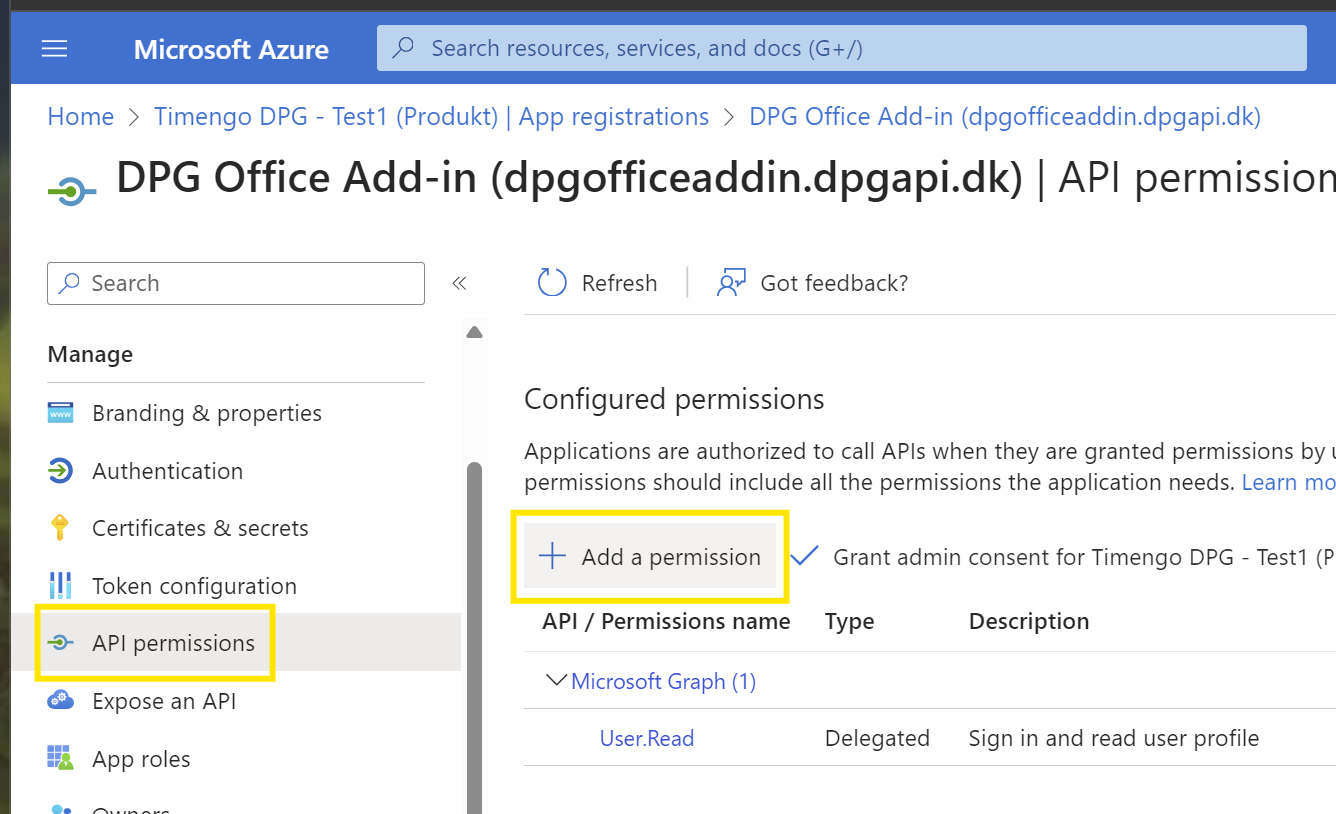
Åbn panelet API permissions, og vælg Add a permission:
-
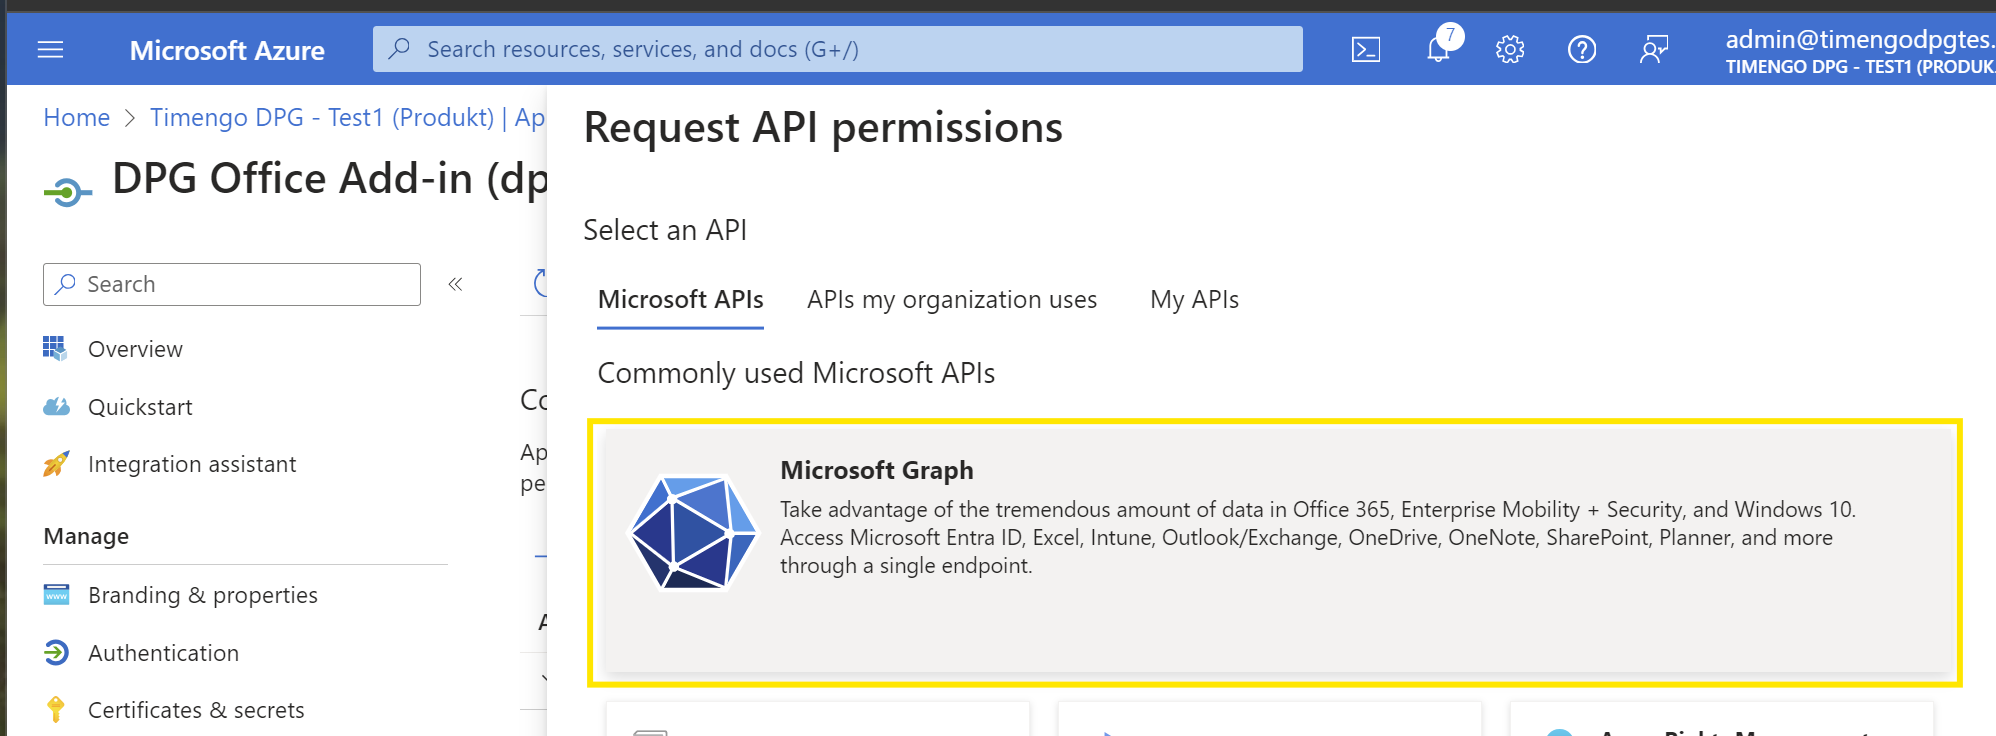
Vælg Microsoft Graph:
-
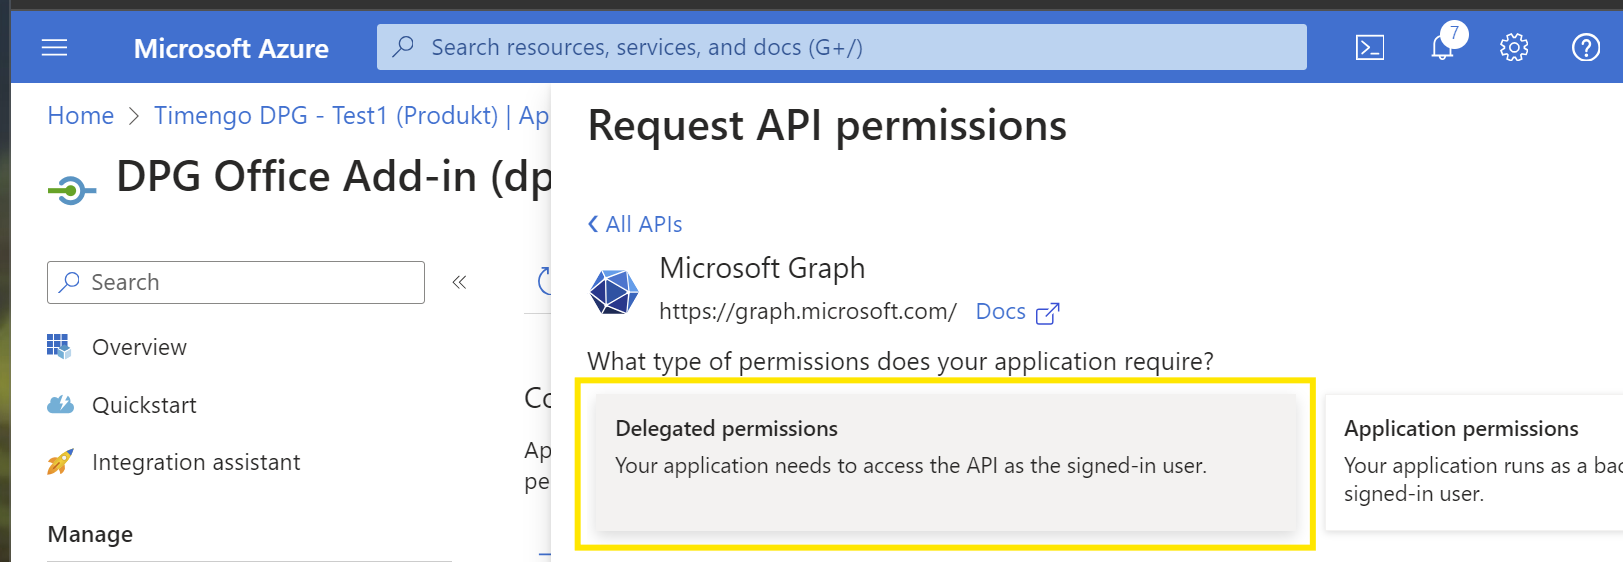
Vælg Delegated permissions:
-
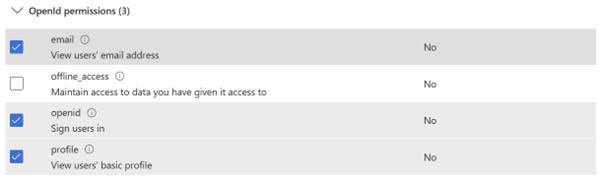
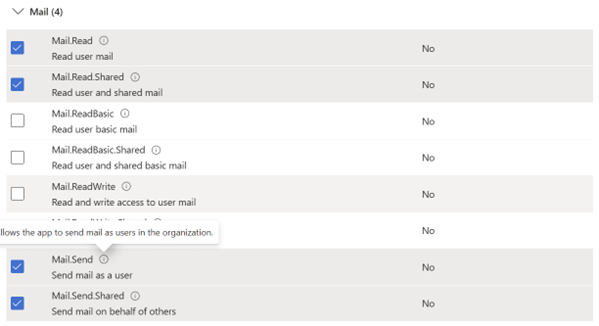
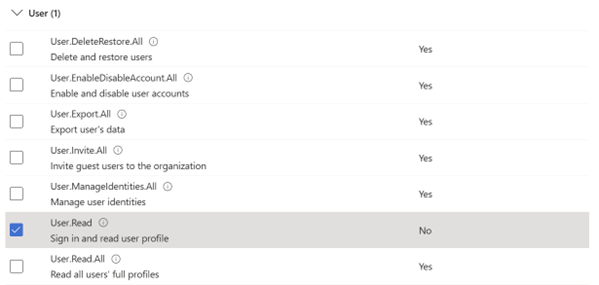
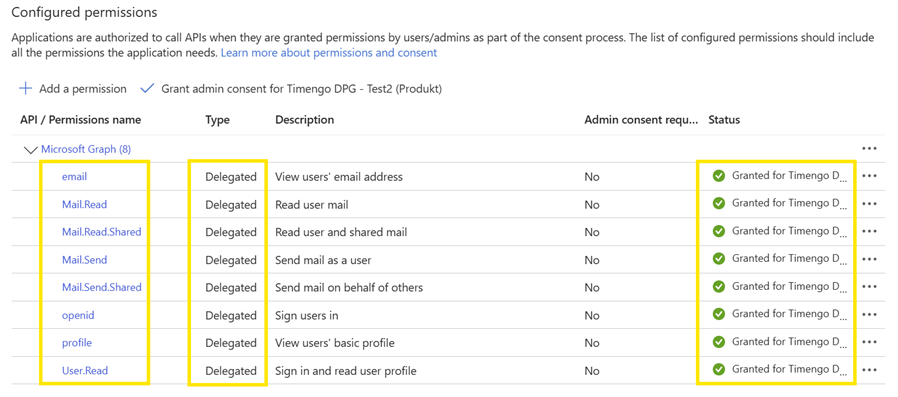
Vælg rettigheder for
email,openid,profile,Mail.Read,Mail.Send,Mail.Read.Shared,Mail.Send.Shared, ogUser.Read. Afslut ved at vælge Add permissions:

-
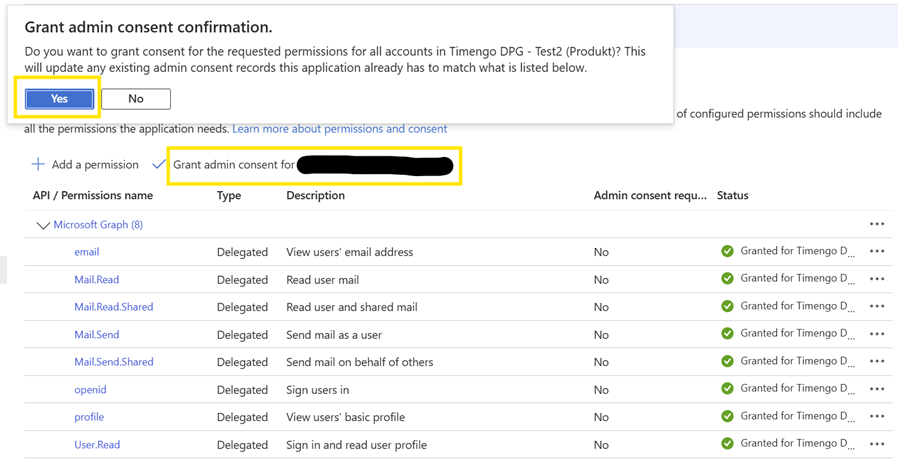
I panelet Configured permissions vælger du Grant admin consent for…, og afslutter ved at vælge Yes.
-
Når rettighederne er givet, bør visningen Configured permissions se sådan ud:
-
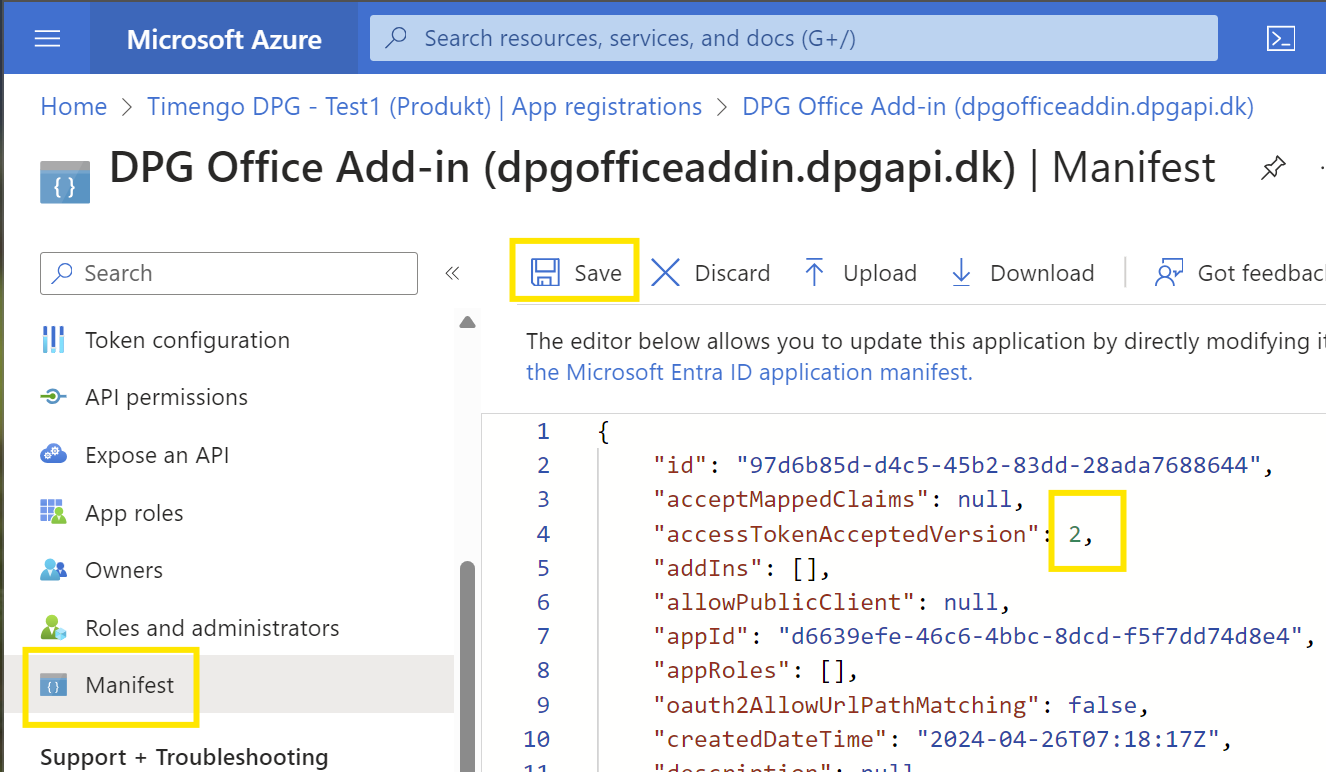
Vælg Manifest, og ændr værdien for
"accessTokenAcceptedVersion"fra null til2, og vælg Save for at afslutte.
-
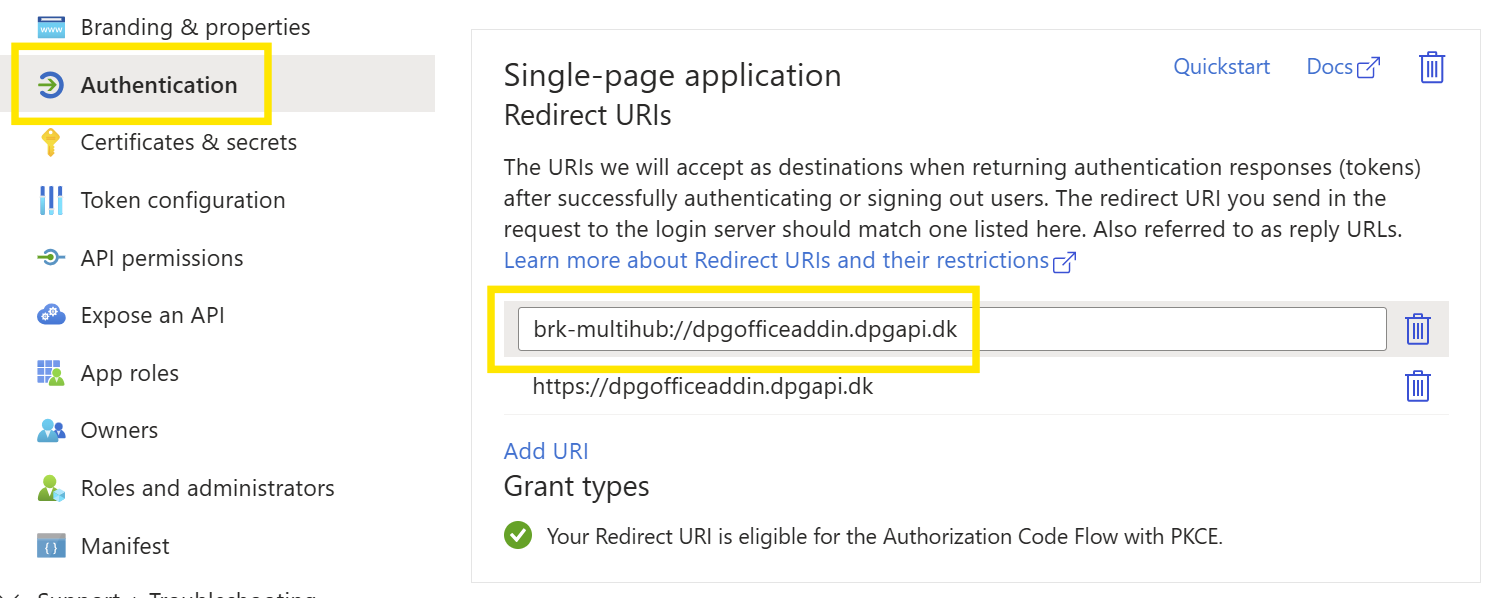
Vælg Authentication for den app-registrering, du har oprettet. I sektionen Single-page application Redirect URIs vælger du Add URI og tilføjer værdien
brk-multihub://dpgofficeaddin.dpgapi.dk. Vælg Save for at afslutte.
Overdragelse til Timengo DPG
Efter at have gennemført konfigurationstrinene skal du overdrage følgende oplysninger til Timengo DPG som angivet i velkomstbrevet:
- Konfigurationsoplysninger for DPG Outlook Office Add-In:
- Application (client) ID
- Directory (tenant) ID
Du har nu gennemført konfigurationen for DPG Outlook Office Addin.